安装插件 Really Static 插件实现完全静态化 [提升速度] 实现 https://www.xxx.com/%postname%.html
1 | 教程:https://www.cnblogs.com/wenyang-rio/archive/2012/12/18/2822997.html |
代码1:有用到网站上 [PAGE页面加”.html”] 代码2:没有到网站上 [会引起page翻页变成 http://www.xxx.com/page/2/index.html 而且还打不开] 代码3:有用到网站上 [Product页面加”.html”] Really Static 插件 没有用到网站上,怕到时评论,chat live聊天软件,流量统计会受影响
16-1 插件下载地址:
https://webcode.bndstone.com/wordpress/plugin/really-static.zip
16-2 插件安装之前要先准备如下:
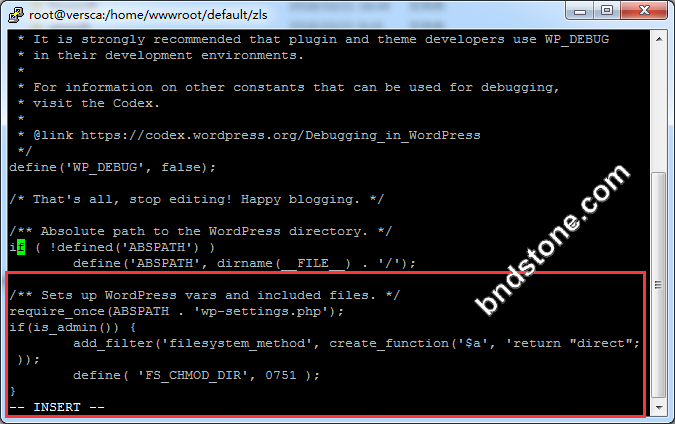
16-2-1 解决FTP验证错误
vi wp-config.php 时需增加以下代码在结尾
1 2 3 4 | if(is_admin()) { add_filter('filesystem_method', create_function('$a', 'return "direct";' )); define( 'FS_CHMOD_DIR', 0751 ); } |
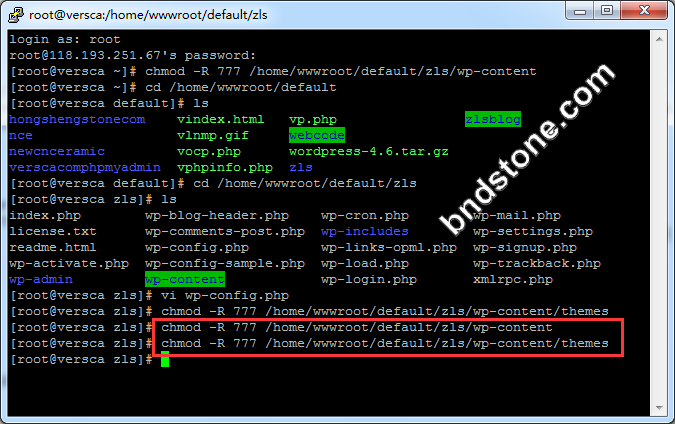
16-2-3 解决无权限错误
1 2 3 | cd /home/wwwroot/default/chinastonetops/ mkdir page sudo chmod 777 /home/wwwroot/default/chinastonetops/page //授权有写入权限 |
1 2 3 | chmod -R 777 /home/wwwroot/default/chinastonetops/page chmod -R 777 /home/wwwroot/default/chinastonetops/wp-content chmod -R 777 /home/wwwroot/default/chinastonetops/wp-content/themes |
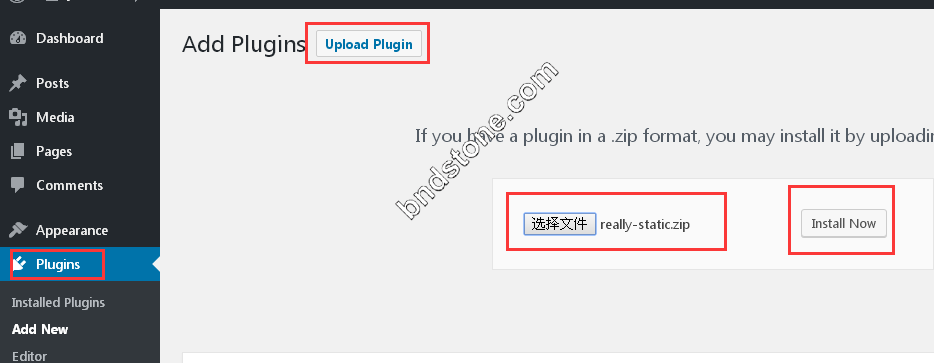
16-2 后台安装插件Really Static
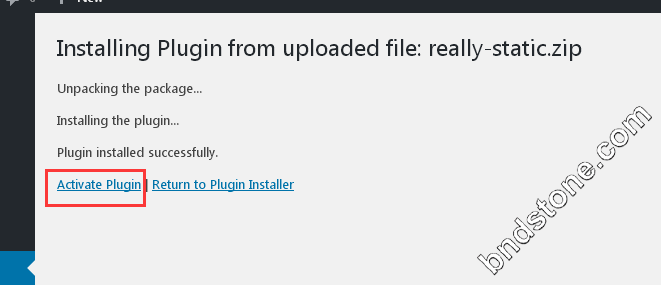
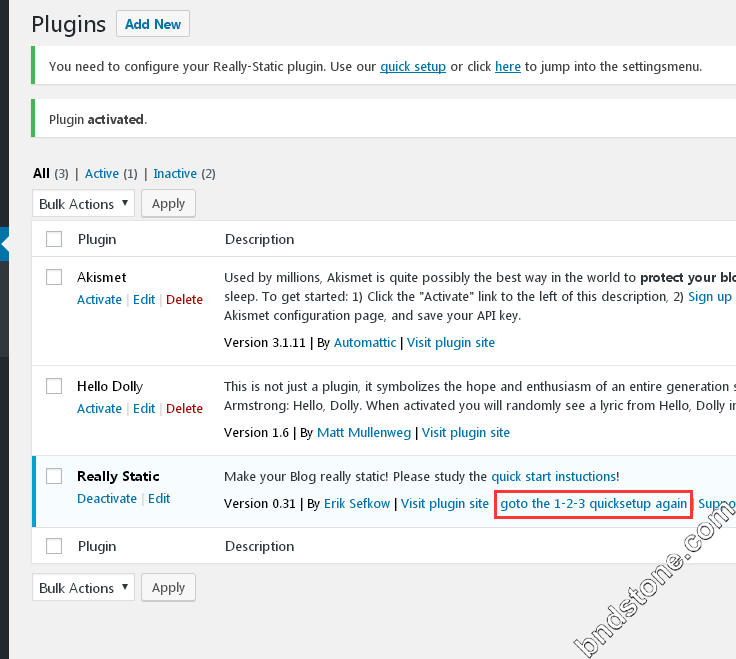
Plugins – Add New – Upload Plugins – 选择文件 – really-static.zip – install now – 显示安装成功 [Plugin installed successfully]
Plugins – Really Static – Activate – Apply
16-3 设置 Really Static 插件
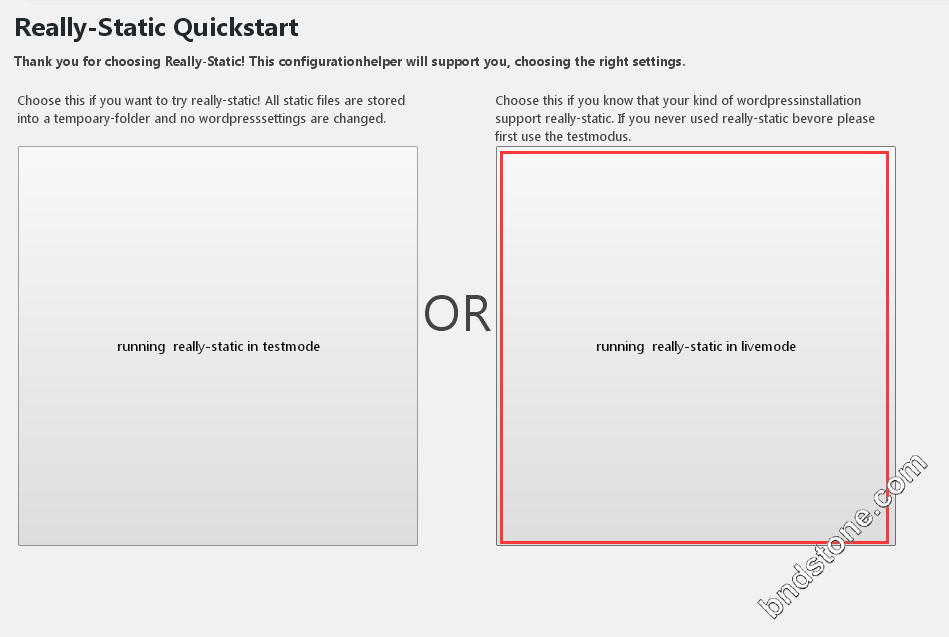
Plugins – Really Static – goto the 1-2-3 quicksetup again – running really-static in testmode
work with local filesystem : /home/wwwroot/default/chinastonetops/page/
After this, please say where visitors can view this files: https://www.bndstone.com/page/
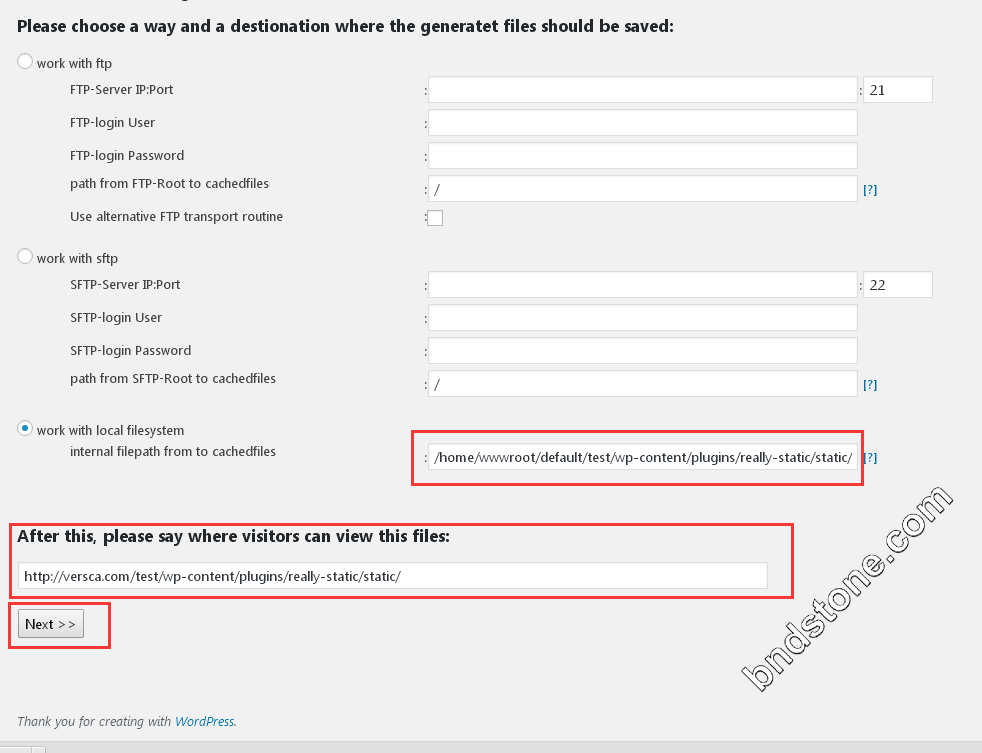
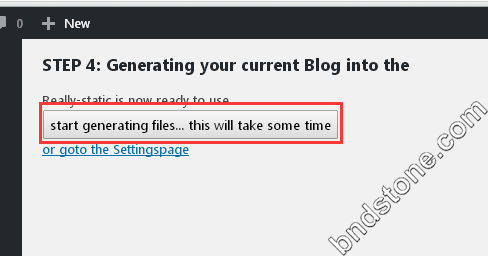
1 2 | work with local filesystem : /home/wwwroot/default/chinastonetops/page/ After this, please say where visitors can view this files: https://www.bndstone.com/page/ |
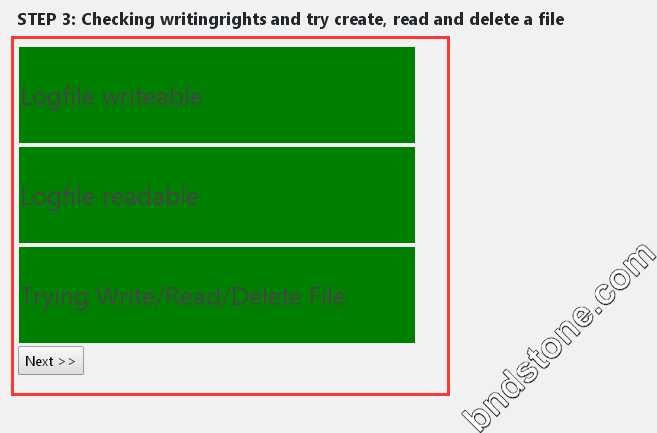
>>Next
以后写文章,只要按如下就会自动生成静态
Settings >> Really Static >> Reset >> reset filedatebase
16-4 以上只是通过配置生成了静态页面,是第一次使用配置需要,后面写新文章后,只需要在设置里面重新生成下静态文件,插件会自动重写覆盖之前的页面,下面简单介绍下
Really Static Settings的选项设置,只有两点需要注意:
16-4-1 source和destination的路径配置和初始配置的路径保持一致,一次配置后面无需变动,除非你想把静态文件生成在新目录的时候,如下图:

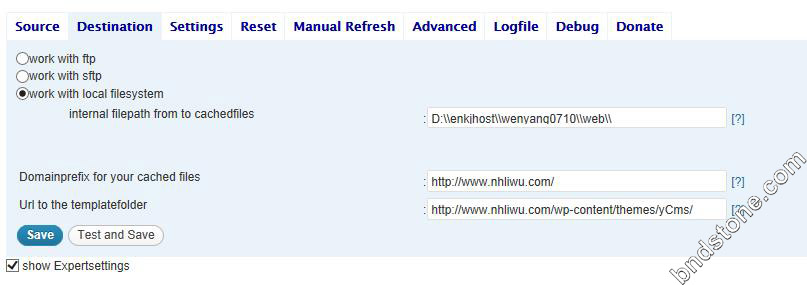
16-4-2 写了新文章如果想立马生成静态的,只需要先把网站先改为动态访问模式,然后在Reset下点击reset filedatabase,Manual Refresh下点击write all files就OK了,如下
图:


16-4 .设置的话,一般情况下,我们选用默认的设置就行了,这里来主要说说Advanced设置[Settings、Manual Refresh、Advanced]。[https://www.shejiku.net/really-static.html]
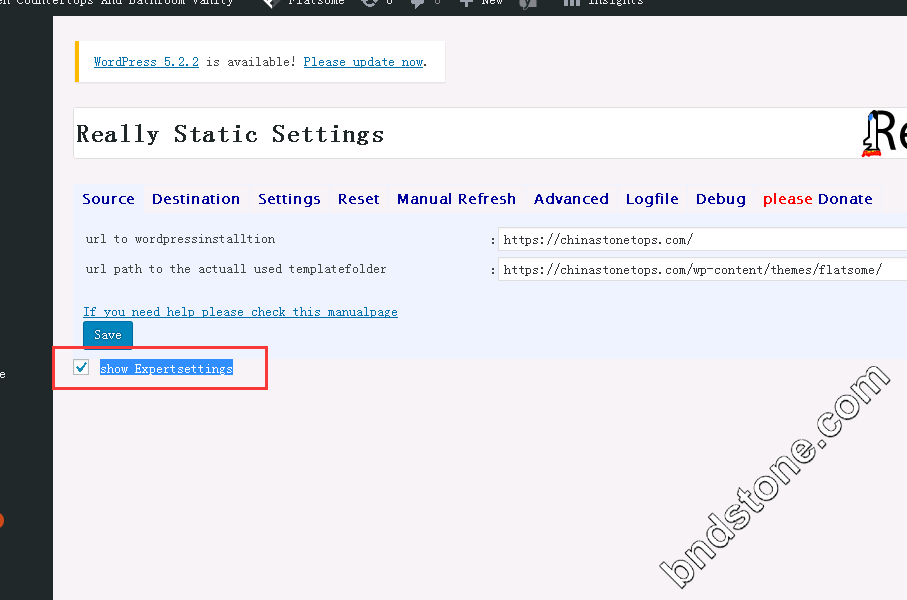
开启高级设置功能
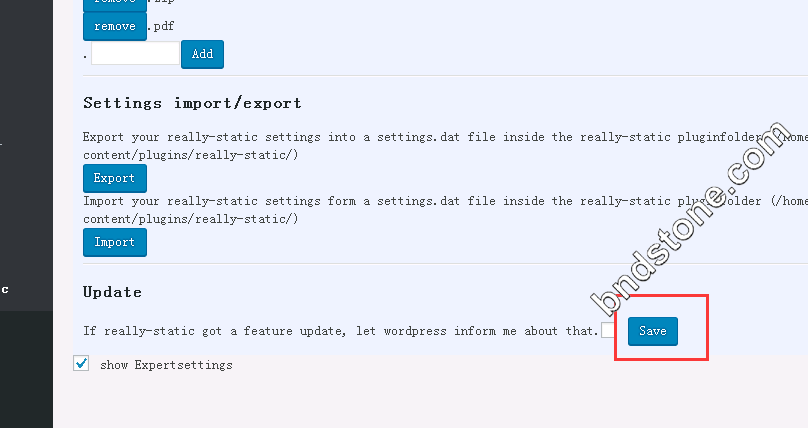
Settings >> Really Static >> show Expertsettings [打勾]
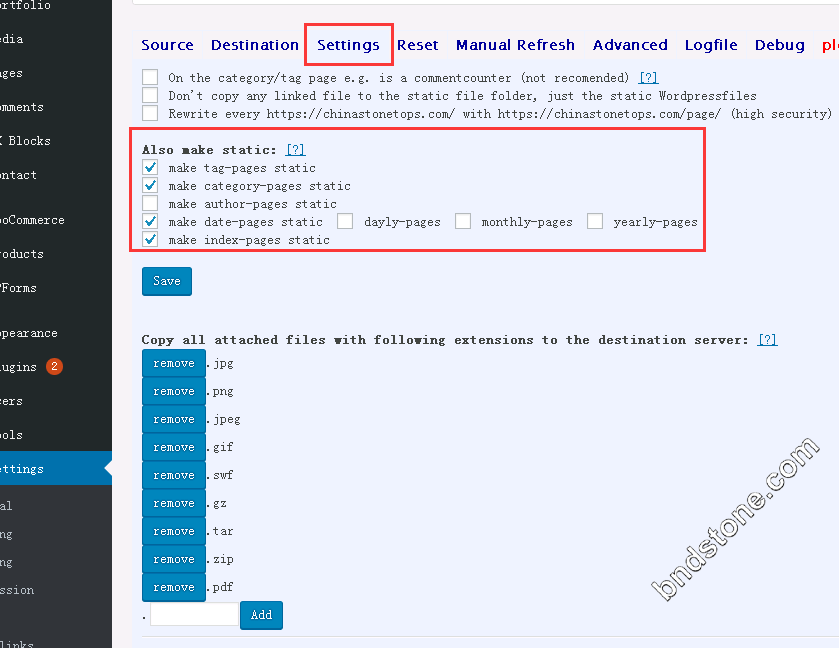
16-5 Setting 高级设置
Settings >> Really Static >> show Expertsettings
make tag-pages static [打勾] make category-pages static [打勾] make date-pages static [打勾] make index-pages static [打勾]
save
16-6 Manual Refresh高级设置
这个选项是让你自定义重写缓存的规则,也就是定义在什么情况下更新缓存,
really static提供了三种自定义规则供站长定义,大概意思如下翻译:
1、Rewrite url —— 修改链接后更新缓存
2、Refresh page on Condition —— 更新指定条件文章后更新缓存(比如撰写、修改、删除等操作后)
3、Refresh page at specific time —— 指定多久更新一次缓存 (比如按小时、按天、按月)
已设置任何有变动都更新,不知道有没有效果

16-7.Manual Refresh设置[缓存更新]
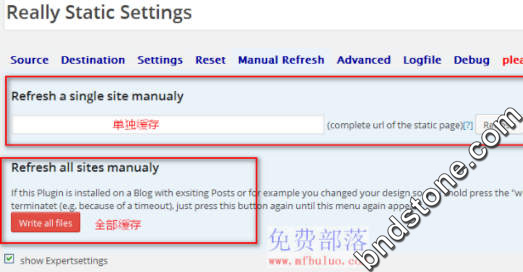
如上图,有两个缓存选择,第一是单独一个url进行缓存,第二是全部缓存,
当进行全部缓存或者更新文章后插件没有即时更新缓存时,可以采用单独缓存进行提交。完成了大部分
基础设置,最后我们点击“Write all files”开始将网站全部转换为静态缓存!
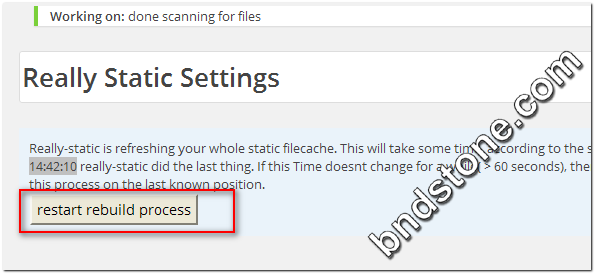
这时不要关闭或者刷新这个页面,转换时间依网站内容多少来定,内容越多时间自然越长,转换好之后页面的载入状态会自然停止,如果超出60秒也会自然停止,如果你发现某一
些页面没有缓存成功,可以再补充缓存一次。
查看是否已经将页面缓存
最后如何才能知道我的网站各个页面是否都已经被准确缓存了?按理说really static的生成缓存时,先是替换你网站的各个文章、目录的url,然后再开始缓存的。
要想知道页面是否被缓存,一方面可以直接看缓存目录,另一方面可以看页面的数据库的查询次数是否改变 或者查询时间是否有改变,如果不变说明已经被缓存。
16-8 网站后台更改为 %postname%.html
http://zmingcx.com/wordpress-page-link-html-suffix.html
http://zmingcx.com/wordpress-page-tags-url-add-html-suffix.html //加插件的方法
settings > permalinks > Common Settings > Custom Structure > /%postname%.html
settings > permalinks > Custom base > /%postname%.html
save change
页面转.html
http://zmingcx.com/wordpress-page-link-html-suffix.html
1 2 | cd /home/wwwroot/default/chinastonetops/wp-content/themes/flatsome/ vi functions.php |
1 2 3 4 5 6 7 8 9 | <del datetime="2019-07-29T12:42:45+00:00"> // 页面链接添加html后缀</del> add_action('init', 'html_page_permalink', -1); function html_page_permalink() { global $wp_rewrite; if ( !strpos($wp_rewrite->get_page_permastruct(), '.html')){ $wp_rewrite->page_structure = $wp_rewrite->page_structure . '.html'; } } |
1 2 3 4 5 6 7 8 | <del datetime="2019-07-29T12:42:45+00:00"> //添加斜杠</del> function nice_trailingslashit($string, $type_of_url) { if ( $type_of_url != 'single' && $type_of_url != 'page' ) $string = trailingslashit($string); return $string; } add_filter('user_trailingslashit', 'nice_trailingslashit', 10, 2); |
1 2 3 | sudo systemctl stop nginx systemctl restart nginx systemctl status nginx |
添加后,需要到固定链接设置页面,重新保存一下固定链接设置,否则不会生效.
settings > permalinks > Common Settings > Custom Structure > /%postname%.html
settings > permalinks > Custom base > /product
https://bndstone.com/about-us.html 正常
https://bndstone.com/contact-us.html 正常
https://bndstone.com/project.html/ 正常
https://bndstone.com/product-category/bathroom-vanity-top/
https://bndstone.com/product-category/bathroom-vanity-top/page/4/
https://bndstone.com/product/multicolor-red-granite-vanity-tops
https://bndstone.com/product/columbo-juparano-granite-vanity-tops
下面这个方法最好用.
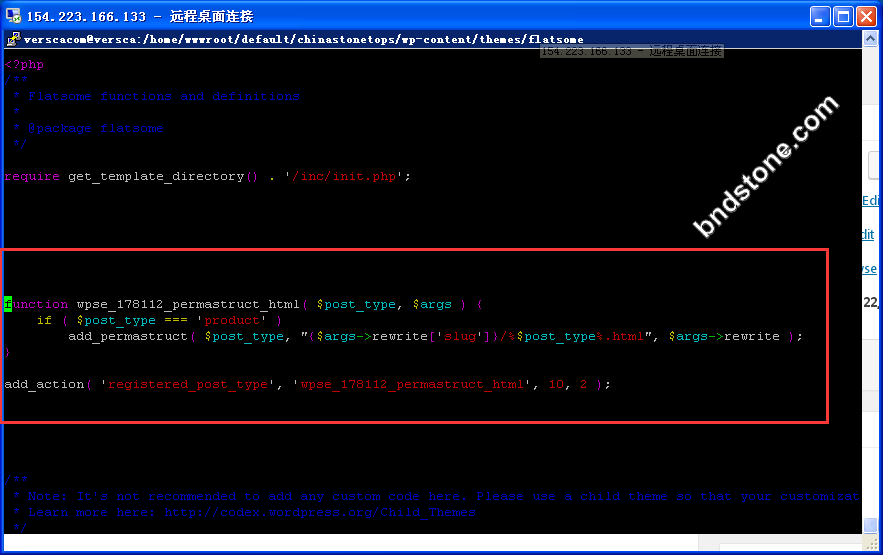
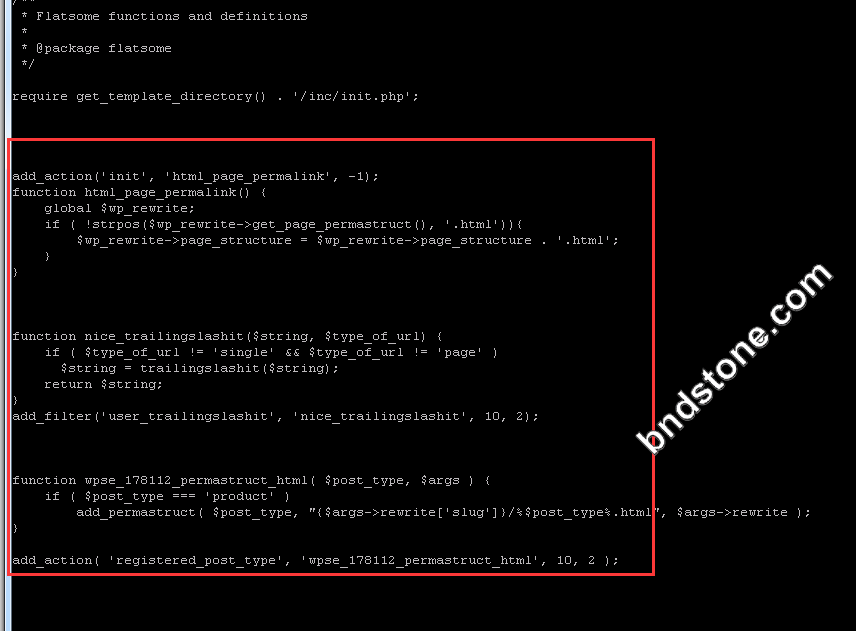
主题functions.php中加入如下代码
https://wordpress.org/support/topic/html-extension-for-products-in-wordpress-and-woocommerce-2/
1 2 | cd /home/wwwroot/default/chinastonetops/wp-content/themes/flatsome/ vi functions.php |
1 2 3 4 5 | function wpse_178112_permastruct_html( $post_type, $args ) { if ( $post_type === 'product' ) add_permastruct( $post_type, "{$args->rewrite['slug']}/%$post_type%.html", $args->rewrite ); } add_action( 'registered_post_type', 'wpse_178112_permastruct_html', 10, 2 ); |
1 2 3 | sudo systemctl stop nginx systemctl restart nginx systemctl status nginx |
添加后,需要到固定链接设置页面,重新保存一下固定链接设置,否则不会生效.
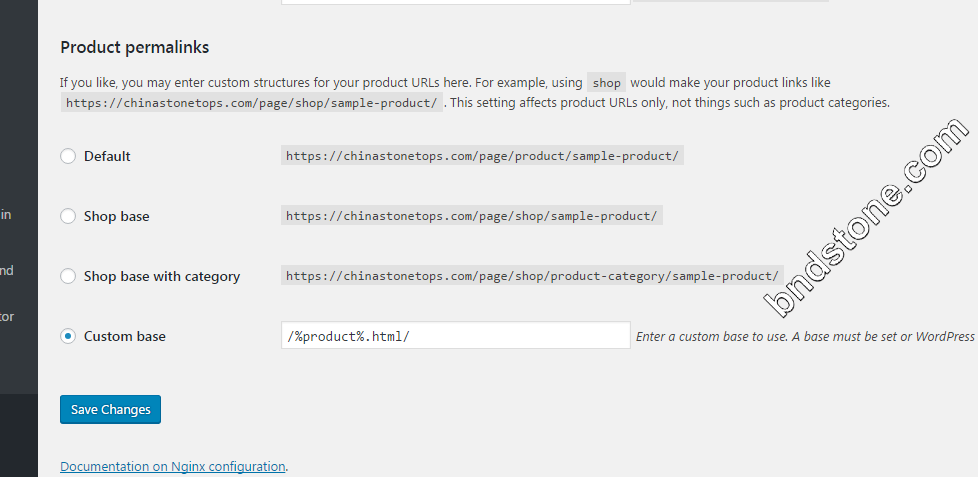
settings > permalinks > Common Settings > Custom Structure > /%postname%.html
settings > permalinks > Custom base > /product
//千万别加”%product%.html” 否则会出现 https://bndstone.com/page/product/multicolor-red-granite-vanity-tops.html/multicolor-red-granite-vanity-tops.html 页面
save change
Settings >> Really Static >> Reset >> reset filedatebase
最后一测试发现
page页面都变了,但product页面也变了
https://bndstone.com/page/about-us.html
https://bndstone.com/page/contact-us.html
https://bndstone.com/page/project.html
https://bndstone.com/page/product/multicolor-red-granite-vanity-tops.html
16-8. 以上是我对really static 插件的使用介绍,我做三点总结:
A 每次用插件生成静态页面的时候都需要把网站改为默认的动态访问形式,我猜想插件会像爬虫一样爬到每个动态页然后生成静态页。(例:我的是php网站,把网站起始页面设置
成index.php。这个很关键,我最开始使用的时候,生成了一次成功了,后来发表了新文章,然后在设置页(Really Static Settings)重新生成一下静态页面,由于当前网站是静
态的,生成的页面都是指向网站的首页index.html,这个我目前没找到原因,比较困惑。)
B 要把静态文件生成在网站根目录下,这样浏览器地址简洁好看。生成在其他路径下我目前还没有找到解决办法,我那样做过,试图用把网站域名解析到所在目录路径,但是未果.
唉
C 生成成功后,再把网站起始页面改为index.html,这样网站运行的才是生成的静态页面
优势:
1. 速度加快很多
2. 可以整站内容搬迁,是完全静态化
劣势:
生成的静态页面没有postname,对搜索引擎评分影响肯定很大
https://www.bndstone.com/html/page_id=272/index.html [About Us页面] https://www.bndstone.com/html/page_id=276/index.html [Contact Us页面]