37 sersync命令详解
1 2 3 | 官方: https://github.com/wsgzao/sersync https://blog.51cto.com/gm100861/949094 https://www.jianshu.com/p/05ead9e7638d |
传输大量小文件: 用 rsync + inotify-tools 传输
传输大量大文件: 用 rsync + inotify-tools + sersync 传输
1. 安装配置好 Rsync : https://www.bndstone.com/1245.html [3-5步骤就好] 2. 安装配置好 Inotify-tools : https://www.bndstone.com/1309.html [5-2步骤就好] 3. 安装配置好 Sersync
1-1. 安装 sersync
1 2 3 | wget https://linuxsoft.bndstone.com/sersync/sersync2.5.4_64bit_binary_stable_final.tar.gz //下载 https://linuxsoft.bndstone.com/sersync/sersync2.5.4_64bit_binary_stable_final.tar.gz tar -zxvf sersync2.5.4_64bit_binary_stable_final.tar.gz //解压 sersync2.5.4_64bit_binary_stable_final.tar.gz mv GNU-Linux-x86/ /usr/local/sersync/ //移动 |
2-1. 查看是否已经安装成功
1 | ll /usr/local/sersync/ //查看是否有 sersync2 |
3-1. 修改sersync配置文件
1 | vi /usr/local/sersync/confxml.xml |
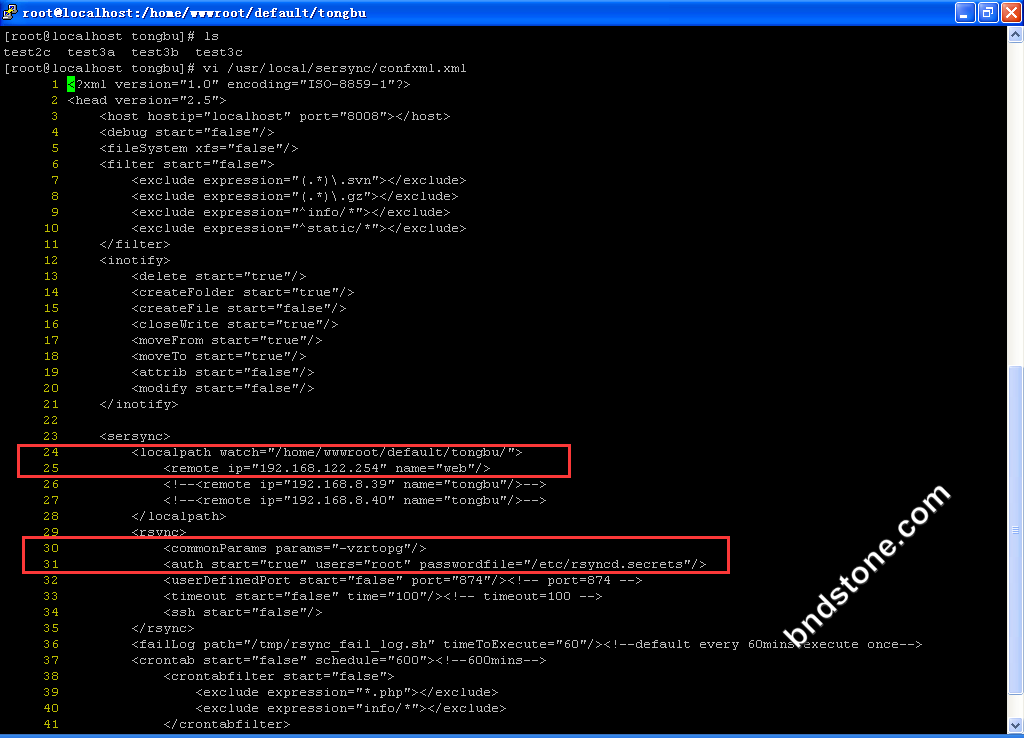
只需要修改 24,25 ,30,31 行

3-2. sersync启动位置
1 | /usr/local/sersync/sersync2 |
4-1. 启动运行sersync
nohup
sersync2位置
在监控前,将监控目录与远程主机用rsync命令推送一遍
启用守护进程模式
指定配置文件 为 /usr/local/sersync/confxml.xml
日志地址 /var/log/sersync.log
1 | nohup /usr/local/sersync/sersync2 -r -d -o /usr/local/sersync/confxml.xml > /var/log/sersync.log 2>&1 & |
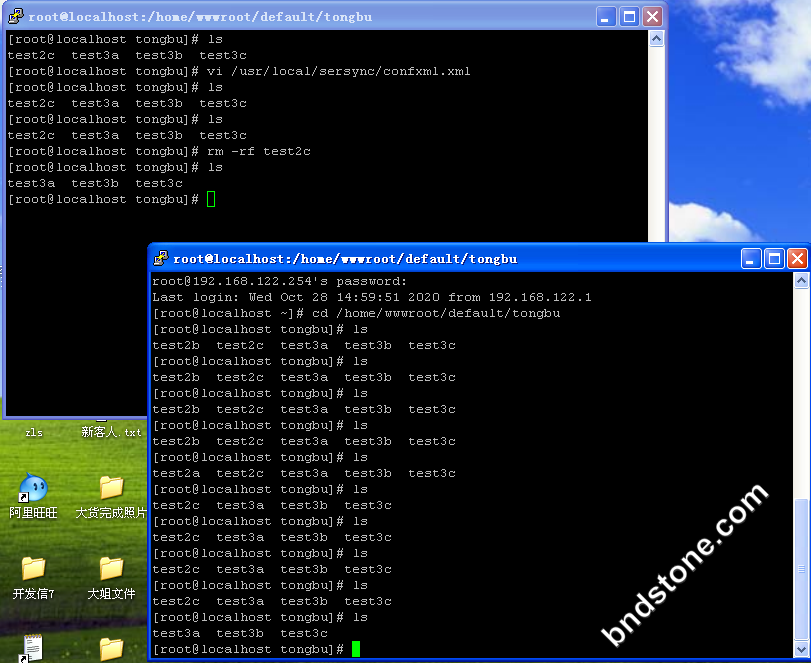
看这张图说明已经自动同步成功

5-1. 启用守护进程模式
1 | -d |
5-2. 在监控前,将监控目录与远程主机用rsync命令推送一遍
1 | -r |
5-3. 指定开启守护线程的数量,默认为10个
1 | -n 10 |
5-4. 指定配置文件,默认使用confxml.xml文件
1 | -o |
5-4-2. 指定配置文件 为 /usr/local/sersync/confxml.xml
1 | -o /usr/local/sersync/confxml.xml |
6-1-1. debug 参数设置为false, 在sersync正在运行的控制台,不会打印inotify事件与rsync同步命令 – 默认
1 | <debug start="false"/> |
6-1-2. debug 参数设置为true,会在sersync正在运行的控制台,打印inotify事件与rsync同步命令
1 | <debug start="true"/> |
6-2-1. filesystem 参数设置为false, 对于非xfs文件系统的用户,不需要将这个选项开启. – 默认
1 | <filesystem xfs="false"/> |
6-2-2. filesystem 参数设置为true,对于xfs文件系统的用户,需要将这个选项开启,才能使sersync正常工作.
1 | <filesystem xfs="true"/> |
6-3-1. filter 参数设置为false ,关闭-exclude选项
1 | <filter start="false"> |
6-3-2. filter 参数设置为true ,打开 -exclude 选项
1 | <filter start="true"> |
6-3-3. filter 参数设置为true,在exclude标签中,填写正则表达式,过滤监控目录下的info路径(监控路径/info /*)- 相比较使用rsync 的exclude功能,被过滤的路径,不会加入监控,大大减少rsync的通讯量
1 | <exclude expression="^info/*"></exclude> |
6-3-4. filter 参数设置为true,在exclude标签中,填写正则表达式,过滤以”.gz”结尾的文件 – 相比较使用rsync 的exclude功能,被过滤的路径,不会加入监控,大大减少rsync的通讯量
1 | <exclude expression="(.*)\.gz"></exclude> |
6-4-1. delete 参数设置为false,则不对删除事件进行监控。
1 | <delete start="false"/> |
6-4-2. delete 参数设置为true,则对删除事件进行监控。
1 | <delete start="true"/> |
6-5-1. createFolder参数设置为false,则不会对产生的目录进行监控
1 | <createFolder start="false"/> |
6-5-2. createFolder参数设置为true,则会对产生的目录进行监控
1 | <createFolder start="true"/> |
6-6-1. createFile参数设置为false来提高性能,
减少 rsync通讯。因为拷贝文件到监控目录会产生create事件与close_write事件,所以如果关闭create事件,只监控文件拷贝结束时的事 件close_write,同样可以实现文件完整同步。
1 | <createFile start="false"/> |
6-6-2. createFile参数设置为true
1 | <createFile start="true"/> |
注意:强将createFolder保持为true,如果将createFolder设为false,则不会对产生的目录进行监控,该目录下的子文件与子目录也不会被监控。所以除非特殊需要,请开启。默认情况下对创建文件(目录)事件与删除文件(目录)事件都进行监控,
6-7-1. closeWrite 参数设置为false
1 | <closeWrite start="false"/> |
6-7-2. closeWrite 参数设置为true
1 | <closeWrite start="true"/> |
6-8-1. moveFrom 参数设置为false
1 | <moveFrom start="false"/> |
6-8-2. moveFrom 参数设置为true
1 | <moveFrom start="true"/> |
6-9-1. moveTo 参数设置为false
1 | <moveTo start="false"/> |
6-9-2. moveTo 参数设置为true
1 | <moveTo start="true"/> |
6-10-1. attrib 参数设置为false
1 | <attrib start="false"/> |
6-10-2. attrib 参数设置为true
1 | <attrib start="true"/> |
6-11-1. modify 参数设置为false
1 | <modify start="false"/> |
6-11-2. modify 参数设置为true
1 | <modify start="true"/> |
6-12-1. localpath 参数 ,监控的目录 /home/wwwroot/default/tongbu/
1 | <localpath watch="/home/wwwroot/default/tongbu/"> |
6-13-1. remote 参数 ,B服务器的IP: 192.168.122.254 , rsync服务里面定义的标签:web
1 | <remote ip="192.168.122.254" name="web"/> |
6-14-1. commonParams 参数 ,rsync 对应 命令 -vzrtopg
1 | <commonParams params="-vzrtopg"/> |
6-15-1. auth 参数 , 授权用户:root ,密码在 /etc/rsyncd.secrets
1 | <auth start="true" users="root" passwordfile="/etc/rsyncd.secrets"/> |
6-16-1. userDefinedPort 参数 设置为 false ,关闭使用874端口
1 | <userDefinedPort start="false" port="874"/> |
6-16-2. userDefinedPort 参数 设置为 true ,开启使用874端口
1 | <userDefinedPort start="true" port="874"/> |
6-17-1. timeout 参数 设置为 false , time 默认 100
1 | <timeout start="false" time="100"/> |
6-17-2. timeout 参数 设置为 true , time 默认 100
1 | <timeout start="true" time="100"/> |
6-18-1. ssh 参数 设置为 false (使用rsync -e ssh的方式进行传输)
1 | <ssh start="false"/> |
6-18-2. ssh 参数 设置为 true (使用rsync -e ssh的方式进行传输)
1 | <ssh start="true"/> |
6-19-1. failLog 参数 , 对于失败的传输,会进行重新传送,再次失败就会写入 /var/log/rsync_fail_log.log,然后每隔60分钟(timeToExecute进行设置)执行该脚本再次重新传送,然后清空该脚本。
1 | <failLog path="/var/log/rsync_fail_log.log" TimeToExecute="60"/> |
6-20-1. crontab 参数 设置为false –默认schedule为600
crontab可以对监控路径与远程目标主机每隔一段时间进行一次整体同步,可能由于一些原因两次失败重传都失败了,这个时候如果开启了crontab功 能,还可以进一步保证各个服务器文件一致,如果文件量比较大,crontab的时间间隔要设的大一些,否则可能增加通讯开销。schedule这个参数是设置crontab的时间间隔,默认是600分钟
1 | <crontab start="false" schedule="600"> |
6-20-2. crontab 参数 设置为true –默认schedule为600
crontab可以对监控路径与远程目标主机每隔一段时间进行一次整体同步,可能由于一些原因两次失败重传都失败了,这个时候如果开启了crontab功 能,还可以进一步保证各个服务器文件一致,如果文件量比较大,crontab的时间间隔要设的大一些,否则可能增加通讯开销。schedule这个参数是设置crontab的时间间隔,默认是600分钟
1 | <crontab start="true" schedule="600"> |
如果开启了filter文件过滤功能,那么crontab整体同步也需要设置过滤,否则虽然实时同步的时候文件被过滤了,
但crontab整体同步的时候 如果不单独设置crontabfilter,还会将需过滤的文件同步到远程,crontab的过滤正则与filter过滤的不同,
也给出了两个实例分别对 应与过滤文件与目录。总之如果同时开启了filter与crontab,则要开启crontab的crontabfilter,
并按示例设置使其与filter的过滤一一对应。
6-21-1. crontab 参数 设置为false
1 | <crontabFilter start="false"> |
6-21-2. crontab 参数 设置为true
1 | <crontabFilter start="true"> |
6-22-1. crontab 的-exclude 排除 .gz结尾 的所有文件
1 | <exclude expression="*.gz"></exclude> |
6-22-2. crontab 的-exclude 排除 info 目录下的所有文件
1 | <exclude expression="info/*"></exclude> |
7-1. 设置开机自启动 – rc.local
1 2 | chmod +x /etc/rc.d/rc.local //赋予rc.local执行权限 vi /etc/rc.d/rc.local //编缉rc.local文件 |
最后面增加如下代码:
1 | nohup /usr/local/sersync/sersync2 -r -d -o /usr/local/sersync/confxml.xml > /var/log/sersync.log 2>&1 & |
7-2. 重启
1 | reboot |
1. rsync + inotify-tools + sersync , inotify-tools 不要漏了安装
2. 配置没成功的话 对比一下A服务器,B服务器的IP,看下是否能对得上.
3. 配置没成功的话 看下 firewalld 是否有启动.[放行873端口]
=========================================================================
默认配置
1 2 3 4 5 6 7 8 9 10 11 12 13 14 15 16 17 18 19 20 21 22 23 24 25 26 27 28 29 30 31 32 33 34 35 36 37 38 39 40 41 42 43 44 45 46 47 48 49 50 51 52 53 54 55 56 57 58 59 60 61 62 63 64 65 66 | <?xml version="1.0" encoding="ISO-8859-1"?> <head version="2.5"> <host hostip="localhost" port="8008"></host> <debug start="false"/> <fileSystem xfs="false"/> <filter start="false"> <exclude expression="(.*)\.svn"></exclude> <exclude expression="(.*)\.gz"></exclude> <exclude expression="^info/*"></exclude> <exclude expression="^static/*"></exclude> </filter> <inotify> <delete start="true"/> <createFolder start="true"/> <createFile start="false"/> <closeWrite start="true"/> <moveFrom start="true"/> <moveTo start="true"/> <attrib start="false"/> <modify start="false"/> </inotify> <sersync> <localpath watch="/home/wwwroot/default/tongbu/"> <remote ip="192.168.122.254" name="web"/> <!--<remote ip="192.168.8.39" name="tongbu"/>--> <!--<remote ip="192.168.8.40" name="tongbu"/>--> </localpath> <rsync> <commonParams params="-vzrtopg"/> <auth start="true" users="root" passwordfile="/etc/rsyncd.secrets"/> <userDefinedPort start="false" port="874"/><!-- port=874 --> <timeout start="false" time="100"/><!-- timeout=100 --> <ssh start="false"/> </rsync> <failLog path="/tmp/rsync_fail_log.sh" timeToExecute="60"/><!--default every 60mins execute once--> <crontab start="false" schedule="600"><!--600mins--> <crontabfilter start="false"> <exclude expression="*.php"></exclude> <exclude expression="info/*"></exclude> </crontabfilter> </crontab> <plugin start="false" name="command"/> </sersync> <plugin name="command"> <param prefix="/bin/sh" suffix="" ignoreError="true"/> <!--prefix /opt/tongbu/mmm.sh suffix--> <filter start="false"> <include expression="(.*)\.php"/> <include expression="(.*)\.sh"/> </filter> </plugin> <plugin name="socket"> <localpath watch="/opt/tongbu"> <deshost ip="192.168.138.20" port="8009"/> </localpath> </plugin> <plugin name="refreshCDN"> <localpath watch="/data0/htdocs/cms.xoyo.com/site/"> <cdninfo domainname="ccms.chinacache.com" port="80" username="xxxx" passwd="xxxx"/> <sendurl base="http://pic.xoyo.com/cms"/> <regexurl regex="false" match="cms.xoyo.com/site([/a-zA-Z0-9]*).xoyo.com/images"/> </localpath> </plugin> </head> |