【Nginx教程7】nginx 配置实例 (高可用的集群)
1 2 3 | https://www.bilibili.com/video/BV1zJ411w7SV?p=14 https://www.bilibili.com/video/BV1zJ411w7SV?p=15 https://cloud.tencent.com/developer/article/1332995 |
========J4125 上安装 Esxi系统,然后安装两台centos 7==============
2. 阵列柜上安装kvm ,kvm 里安装两台centos 7, 这样有操作成功.
3. 阿里云上安装docker,docker上安装两台centos 7, 第二台keepalived一直启动不了.所以失败.
1 2 3 4 | 10.10.10.103 10.10.10.174 10.10.10.200 //虚拟IP ens192 //绑定的网卡(当前centos的网卡,ifconfig可以查) |
1. 什么是nginx的高可用.
如果nginx宕机,这个请求还能正常实现.

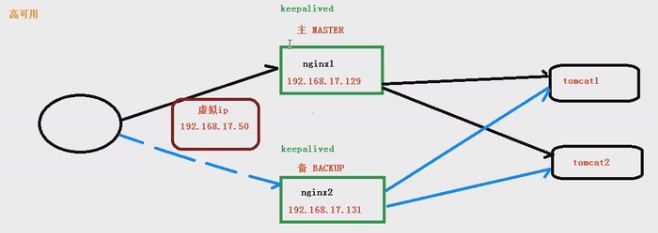
(1) 需要两台nginx服务器
(2) 需要 keepalived
(3) 需要 虚拟的IP地址.
2. 配置高可用的准备工作
(1) 需要两台服务器 10.10.10.103 和 10.10.10.174
(2) 在两台服务器安装nginx
(3) 在两台服务器安装keepalived
3. 操作步骤:
3-1. 两台服务器都安装必备软件,放行端口,然后安装 nginx
安装必备软件
1 2 3 4 5 6 | yum update -y yum install -y wget //安装wget yum install -y telnet //安装telnet yum install -y net-tools //安装ifconfig ,否则连ip是多少都查不到 yum install -y openssh-server //安装sshd yum install -y firewalld && yum install -y firewalld-filesystem && yum install -y firewall-config |
放行端口
1 2 3 4 5 6 | systemctl start firewalld.service && systemctl enable firewalld.service firewall-cmd --zone=public --permanent --add-port=22/tcp && firewall-cmd --zone=public --permanent --add-port=22/udp firewall-cmd --zone=public --permanent --add-port=80/tcp && firewall-cmd --zone=public --permanent --add-port=80/udp firewall-cmd --zone=public --permanent --add-port=443/tcp && firewall-cmd --zone=public --permanent --add-port=443/udp firewall-cmd --zone=public --permanent --add-port=5901/tcp && firewall-cmd --zone=public --permanent --add-port=5901/udp firewall-cmd --reload |
安装pcre
1 2 3 4 5 6 7 | cd /usr/src wget https://linuxsoft.bndstone.com/pcre/pcre-8.37.tar.gz tar -zxvf pcre-8.37.tar.gz cd /usr/src/pcre-8.37 yum install -y gcc gcc-c++ ./configure make && make install |
安装别的依赖
1 | yum install -y gcc zlib zlib-devel pcre-devel openssl openssl-devel |
安装nginx
1 2 3 4 5 6 | cd /usr/src wget https://linuxsoft.bndstone.com/nginx/nginx-1.12.2.tar.gz tar -zxvf nginx-1.12.2.tar.gz cd /usr/src/nginx-1.12.2 ./configure make && make install |
启动nginx
1 2 | cd /usr/local/nginx/sbin/ ./nginx |
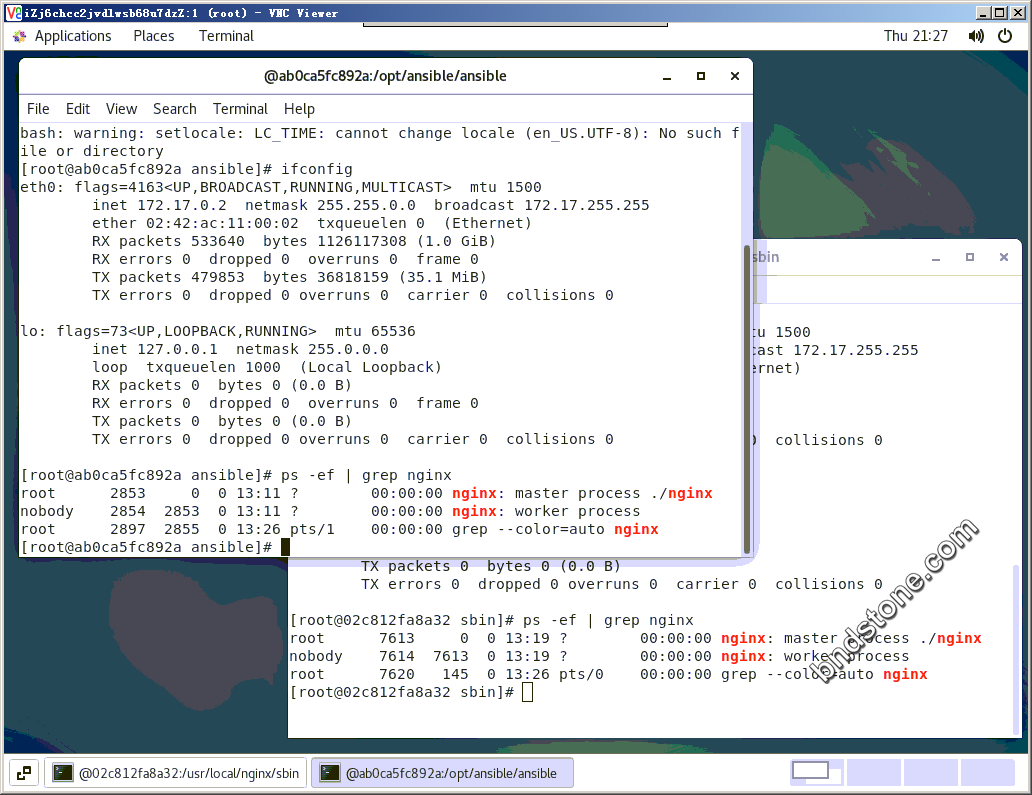
两台服务器 nginx都启动成功.
1 2 | 10.10.10.103 10.10.10.174 |

3-2. 两台服务器都安装keepalived
1 2 3 4 5 | yum install -y keepalived //安装keepalived rpm -q -a keepalived //查看是否已经安装上了 systemctl start keepalived.service //开启keepalived systemctl status keepalived.service //查看是否已经开启keepalived. /etc/keepalived/keepalived.conf //配置文件 |
配置文件默认配置
1 2 3 4 5 6 7 8 9 10 11 12 13 14 15 16 17 18 19 20 21 22 23 24 25 26 27 28 29 30 31 32 33 34 35 36 37 38 39 40 41 42 43 44 45 46 47 48 49 50 51 52 53 54 55 56 57 58 59 60 61 62 63 64 65 66 67 68 69 70 71 72 73 74 75 76 77 78 79 80 81 82 83 84 85 86 87 88 89 90 91 92 93 94 95 96 97 98 99 100 101 102 103 104 105 106 107 108 109 110 111 112 113 114 115 116 117 118 119 120 121 122 123 124 125 126 127 128 129 130 131 132 133 134 135 136 137 138 139 140 141 142 143 144 145 146 147 148 149 150 151 152 153 154 155 | global_defs { notification_email { acassen@firewall.loc failover@firewall.loc sysadmin@firewall.loc } notification_email_from Alexandre.Cassen@firewall.loc smtp_server 192.168.200.1 smtp_connect_timeout 30 router_id LVS_DEVEL vrrp_skip_check_adv_addr vrrp_strict vrrp_garp_interval 0 vrrp_gna_interval 0 } vrrp_instance VI_1 { state MASTER interface eth0 virtual_router_id 51 priority 100 advert_int 1 authentication { auth_type PASS auth_pass 1111 } virtual_ipaddress { 192.168.200.16 192.168.200.17 192.168.200.18 } } virtual_server 192.168.200.100 443 { delay_loop 6 lb_algo rr lb_kind NAT persistence_timeout 50 protocol TCP real_server 192.168.201.100 443 { weight 1 SSL_GET { url { path / digest ff20ad2481f97b1754ef3e12ecd3a9cc } url { path /mrtg/ digest 9b3a0c85a887a256d6939da88aabd8cd } connect_timeout 3 nb_get_retry 3 delay_before_retry 3 } } } virtual_server 10.10.10.2 1358 { delay_loop 6 lb_algo rr lb_kind NAT persistence_timeout 50 protocol TCP sorry_server 192.168.200.200 1358 real_server 192.168.200.2 1358 { weight 1 HTTP_GET { url { path /testurl/test.jsp digest 640205b7b0fc66c1ea91c463fac6334d } url { path /testurl2/test.jsp digest 640205b7b0fc66c1ea91c463fac6334d } url { path /testurl3/test.jsp digest 640205b7b0fc66c1ea91c463fac6334d } connect_timeout 3 nb_get_retry 3 delay_before_retry 3 } } real_server 192.168.200.3 1358 { weight 1 HTTP_GET { url { path /testurl/test.jsp digest 640205b7b0fc66c1ea91c463fac6334c } url { path /testurl2/test.jsp digest 640205b7b0fc66c1ea91c463fac6334c } connect_timeout 3 nb_get_retry 3 delay_before_retry 3 } } } virtual_server 10.10.10.3 1358 { delay_loop 3 lb_algo rr lb_kind NAT persistence_timeout 50 protocol TCP real_server 192.168.200.4 1358 { weight 1 HTTP_GET { url { path /testurl/test.jsp digest 640205b7b0fc66c1ea91c463fac6334d } url { path /testurl2/test.jsp digest 640205b7b0fc66c1ea91c463fac6334d } url { path /testurl3/test.jsp digest 640205b7b0fc66c1ea91c463fac6334d } connect_timeout 3 nb_get_retry 3 delay_before_retry 3 } } real_server 192.168.200.5 1358 { weight 1 HTTP_GET { url { path /testurl/test.jsp digest 640205b7b0fc66c1ea91c463fac6334d } url { path /testurl2/test.jsp digest 640205b7b0fc66c1ea91c463fac6334d } url { path /testurl3/test.jsp digest 640205b7b0fc66c1ea91c463fac6334d } connect_timeout 3 nb_get_retry 3 delay_before_retry 3 } } } |
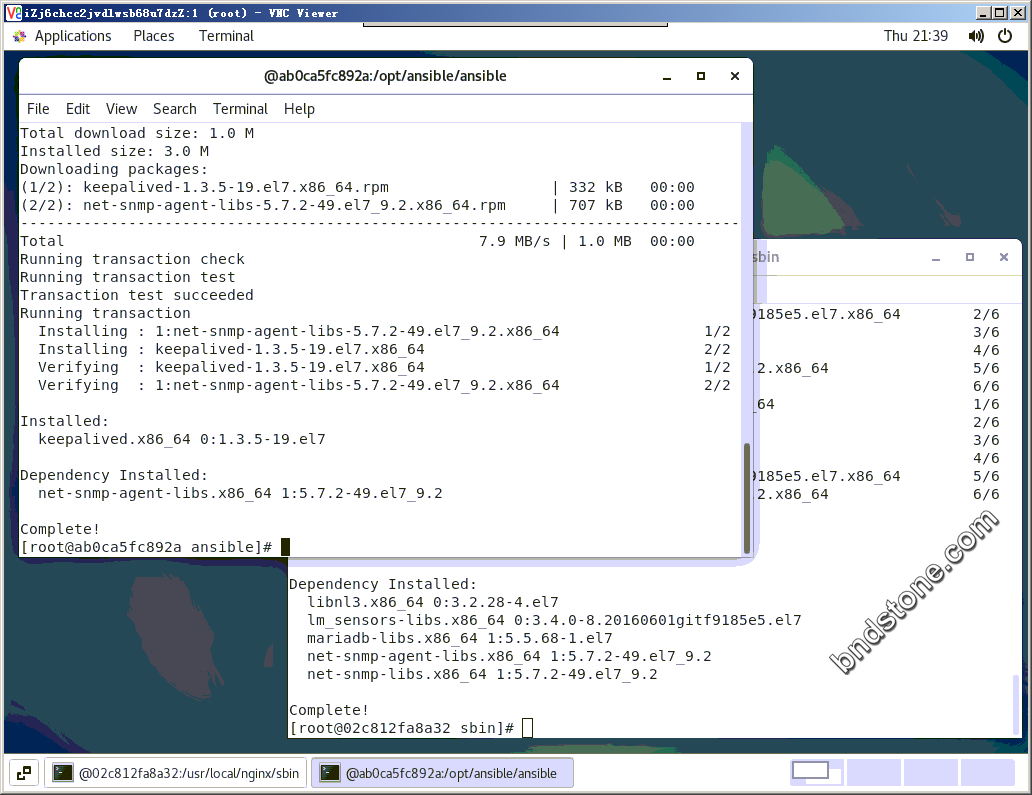
4. 完成高可用服务器配置(主从服务器配置)
1 | vi /etc/keepalived/keepalived.conf |
修改配置文件.
master上的keepalived.conf内容如下
1 2 3 4 5 6 7 8 9 10 11 12 13 14 15 16 17 18 19 20 21 22 23 24 25 26 27 28 29 30 31 | global_defs { notification_email { ancky2006@gmail.com } notification_email_from sns-lvs@gmail.com smtp_server 10.10.10.103 smtp_connection_timeout 30 router_id nginx_master # 设置nginx master的id,在一个网络应该是唯一的 } vrrp_script chk_http_port { script "/usr/local/src/check_nginx.sh" #最后手动执行下此脚本,以确保此脚本能够正常执行 interval 2 #(检测脚本执行的间隔,单位是秒) weight 2 } vrrp_instance VI_1 { state MASTER # 指定keepalived的角色,MASTER为主,BACKUP为备 interface ens192 # 绑定的网卡(当前centos的网卡,ifconfig可以查) virtual_router_id 66 # 虚拟路由编号,主从要一直 priority 100 # 优先级,数值越大,获取处理请求的优先级越高 advert_int 1 # 检查间隔,默认为1s(vrrp组播周期秒数) authentication { auth_type PASS auth_pass 1111 } track_script { chk_http_port #(调用检测脚本) } virtual_ipaddress { 10.10.10.200 # 定义虚拟ip(VIP),可多设,每行一个 } } |
删掉备注后如下:
1 2 3 4 5 6 7 8 9 10 11 12 13 14 15 16 17 18 19 20 21 22 23 24 25 26 27 28 29 30 31 | global_defs { notification_email { ancky2006@gmail.com } notification_email_from sns-lvs@gmail.com smtp_server 10.10.10.103 smtp_connection_timeout 30 router_id nginx_master } vrrp_script chk_http_port { script "/usr/local/src/check_nginx.sh" interval 2 weight 2 } vrrp_instance VI_1 { state MASTER interface ens192 virtual_router_id 66 priority 100 advert_int 1 authentication { auth_type PASS auth_pass 1111 } track_script { chk_http_port } virtual_ipaddress { 10.10.10.200 } } |
backup上的keepalived.conf内容如下:
1 2 3 4 5 6 7 8 9 10 11 12 13 14 15 16 17 18 19 20 21 22 23 24 25 26 27 28 29 30 31 | global_defs { notification_email { ancky2006@gmail.com } notification_email_from sns-lvs@gmail.com smtp_server 10.10.10.174 smtp_connection_timeout 30 router_id nginx_backup # 设置nginx backup的id,在一个网络应该是唯一的 } vrrp_script chk_http_port { script "/usr/local/src/check_nginx.sh" interval 2 #(检测脚本执行的间隔) weight 2 } vrrp_instance VI_1 { state BACKUP # 指定keepalived的角色,MASTER为主,BACKUP为备 interface ens192 # 绑定的网卡(当前centos的网卡,ifconfig可以查) virtual_router_id 66 # 虚拟路由编号,主从要一直 priority 99 # 优先级,数值越大,获取处理请求的优先级越高 advert_int 1 # 检查间隔,默认为1s(vrrp组播周期秒数) authentication { auth_type PASS auth_pass 1111 } track_script { chk_http_port #(调用检测脚本) } virtual_ipaddress { 10.10.10.200 # 定义虚拟ip(VIP),可多设,每行一个 } } |
删掉备注后如下:
1 2 3 4 5 6 7 8 9 10 11 12 13 14 15 16 17 18 19 20 21 22 23 24 25 26 27 28 29 30 31 | global_defs { notification_email { ancky2006@gmail.com } notification_email_from sns-lvs@gmail.com smtp_server 10.10.10.174 smtp_connection_timeout 30 router_id nginx_backup } vrrp_script chk_http_port { script "/usr/local/src/check_nginx.sh" interval 2 weight 2 } vrrp_instance VI_1 { state BACKUP interface ens192 virtual_router_id 66 priority 99 advert_int 1 authentication { auth_type PASS auth_pass 1111 } track_script { chk_http_port } virtual_ipaddress { 10.10.10.200 } } |
nginx检测脚本check_nginx.sh内容如下:
1 | vi /usr/local/src/check_nginx.sh |
1 2 3 4 5 6 7 8 | #!/bin/bash A=`ps -C nginx --no-header |wc -l` if [ $A -eq 0 ];then /usr/local/nginx/sbin/nginx #重启nginx if [ `ps -C nginx --no-header |wc -l` -eq 0 ];then #nginx重启失败,则停掉keepalived服务,进行VIP转移 killall keepalived fi fi |
删掉备注后如下:
1 2 3 4 5 6 7 8 | #!/bin/bash A=`ps -C nginx --no-header |wc -l` if [ $A -eq 0 ];then /usr/local/nginx/sbin/nginx if [ `ps -C nginx --no-header |wc -l` -eq 0 ];then killall keepalived fi fi |
1 | chmod +x /usr/local/src/check_nginx.sh |
5. nginx 页面加入IP地址.
1 2 | cd /usr/local/nginx/html vi index.html |
6. 开启nginx和keepalived.
1 2 3 4 | cd /usr/local/nginx/sbin/ ./nginx systemctl start keepalived.service |
7. 查看是否已经开启成功
1 2 | ps -ef | grep nginx ps -ef | grep keepalived |
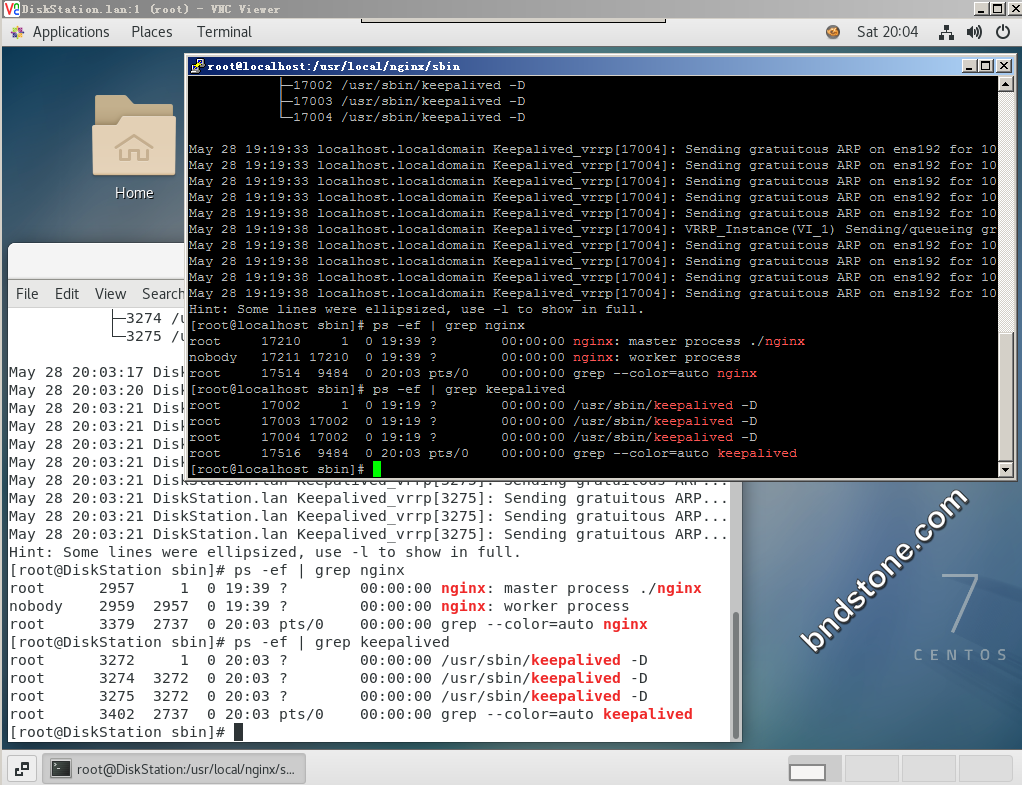
8. 最终测试.
8-1. 浏览器输入虚拟 ip : 10.10.10.200
可以看到已经绑定到 10.10.10.174这台.

8-2. 10.10.10.174 这台 输入
1 | ip a //可以看到10.10.10.200 这个虚拟IP. |
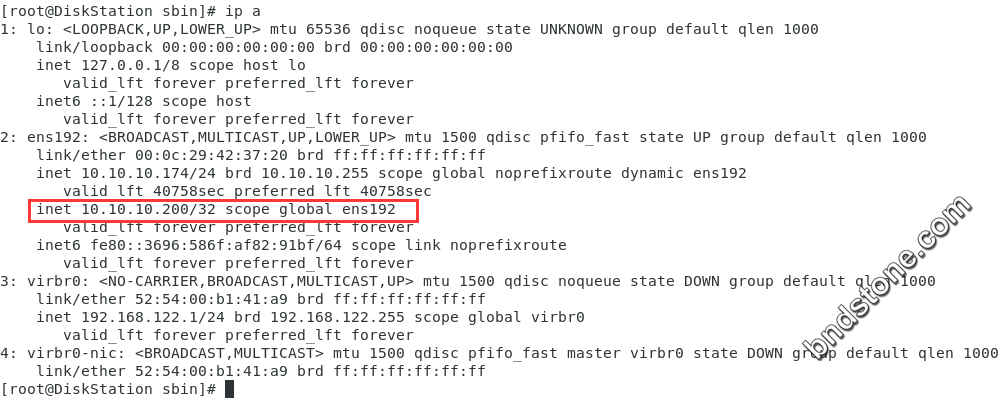
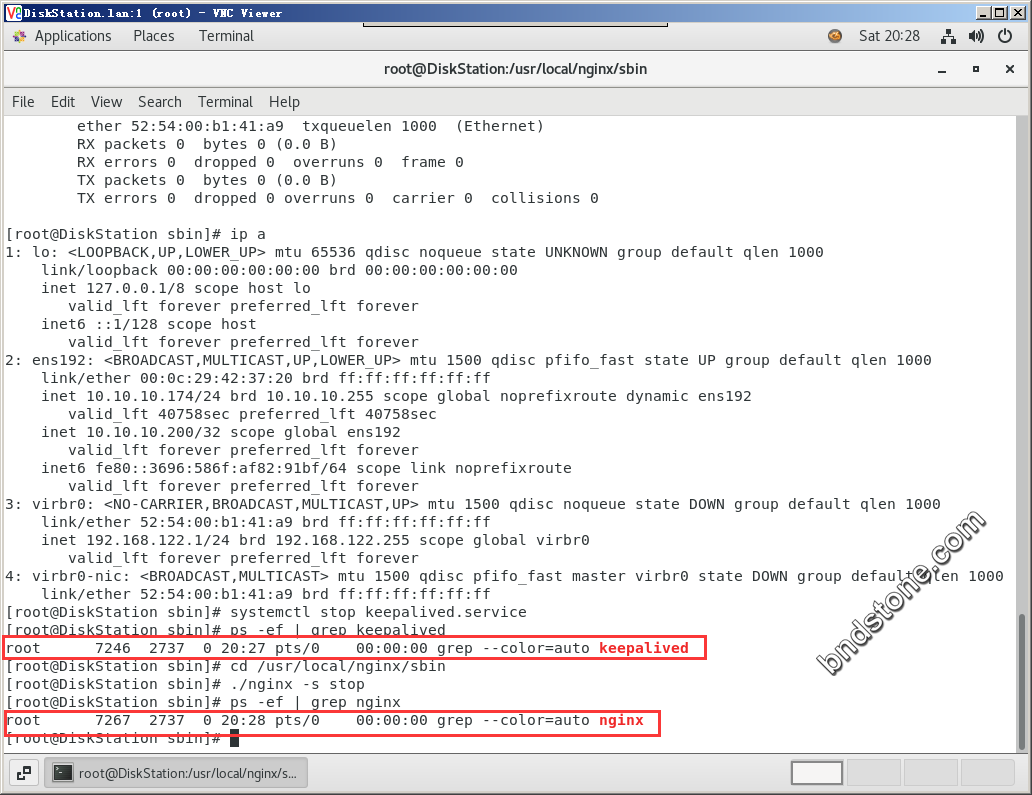
8-3. 10.10.10.174这台 nginx 及 keepalived 都停止,
然后再 浏览器输入虚拟 ip : 10.10.10.200
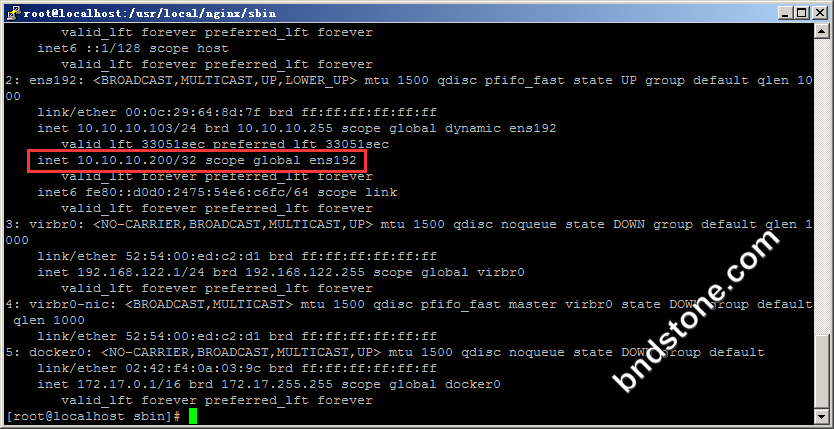
可以看到已经跳转到 10.10.10.103

8-4. 10.10.10.103 这台 输入
1 | ip a //可以看到10.10.10.200 这个虚拟IP. |
1 2 3 4 | 192.168.122.54 192.168.122.101 192.168.122.200 //虚拟IP eth0 //绑定的网卡(当前centos的网卡,ifconfig可以查) |
1 2 | mkdir -p /home/images mkdir -p /home/iso |
1 | cp /home/wwwroot/default/laptop/3_spare/73_Centos_7_4/CentOS-7-x86_64-DVD-1708.iso /home/iso/CentOS_7_64.iso |
1 | systemctl start libvirtd.service |
1 2 | virt-install --name kvm02 --ram 2048 --vcpus=1 --file=/home/images/kvm02.qcow2 --file-size=10 --autostart --vnc --vncport=5902 --video=vga --vnclisten=0.0.0.0 --network network=default --cdrom=/home/iso/CentOS_7_64.iso virt-install --name kvm03 --ram 2048 --vcpus=1 --file=/home/images/kvm03.qcow2 --file-size=10 --autostart --vnc --vncport=5903 --video=vga --vnclisten=0.0.0.0 --network network=default --cdrom=/home/iso/CentOS_7_64.iso |
1 2 | kvm02 192.168.122.54 kvm03 192.168.122.101 |
1. 什么是nginx的高可用.
如果nginx宕机,这个请求还能正常实现.


(1) 需要两台nginx服务器
(2) 需要 keepalived
(3) 需要 虚拟的IP地址.
2. 配置高可用的准备工作
(1) 需要两台服务器 192.168.122.54 和 192.168.122.101
(2) 在两台服务器安装nginx
(3) 在两台服务器安装keepalived
3. 操作步骤:
3-1. 两台服务器都安装必备软件,放行端口,然后安装 nginx
安装必备软件
1 2 3 4 5 6 | yum update -y yum install -y wget //安装wget yum install -y telnet //安装telnet yum install -y net-tools //安装ifconfig ,否则连ip是多少都查不到 yum install -y openssh-server //安装sshd yum install -y firewalld && yum install -y firewalld-filesystem && yum install -y firewall-config |
放行端口
1 2 3 4 5 6 | systemctl start firewalld.service && systemctl enable firewalld.service firewall-cmd --zone=public --permanent --add-port=22/tcp && firewall-cmd --zone=public --permanent --add-port=22/udp firewall-cmd --zone=public --permanent --add-port=80/tcp && firewall-cmd --zone=public --permanent --add-port=80/udp firewall-cmd --zone=public --permanent --add-port=443/tcp && firewall-cmd --zone=public --permanent --add-port=443/udp firewall-cmd --zone=public --permanent --add-port=5901/tcp && firewall-cmd --zone=public --permanent --add-port=5901/udp firewall-cmd --reload |
安装pcre
1 2 3 4 5 6 7 | cd /usr/src wget https://linuxsoft.bndstone.com/pcre/pcre-8.37.tar.gz tar -zxvf pcre-8.37.tar.gz cd /usr/src/pcre-8.37 yum install -y gcc gcc-c++ ./configure make && make install |
安装别的依赖
1 | yum install -y gcc zlib zlib-devel pcre-devel openssl openssl-devel |
安装nginx
1 2 3 4 5 6 | cd /usr/src wget https://linuxsoft.bndstone.com/nginx/nginx-1.12.2.tar.gz tar -zxvf nginx-1.12.2.tar.gz cd /usr/src/nginx-1.12.2 ./configure make && make install |
启动nginx
1 2 | cd /usr/local/nginx/sbin/ ./nginx |

两台服务器 nginx都启动成功.
1 2 | 192.168.122.54 192.168.122.101 |

3-2. 两台服务器都安装keepalived
1 2 3 4 5 | yum install -y keepalived //安装keepalived rpm -q -a keepalived //查看是否已经安装上了 systemctl start keepalived.service //开启keepalived systemctl status keepalived.service //查看是否已经开启keepalived. /etc/keepalived/keepalived.conf //配置文件 |
配置文件默认配置
1 2 3 4 5 6 7 8 9 10 11 12 13 14 15 16 17 18 19 20 21 22 23 24 25 26 27 28 29 30 31 32 33 34 35 36 37 38 39 40 41 42 43 44 45 46 47 48 49 50 51 52 53 54 55 56 57 58 59 60 61 62 63 64 65 66 67 68 69 70 71 72 73 74 75 76 77 78 79 80 81 82 83 84 85 86 87 88 89 90 91 92 93 94 95 96 97 98 99 100 101 102 103 104 105 106 107 108 109 110 111 112 113 114 115 116 117 118 119 120 121 122 123 124 125 126 127 128 129 130 131 132 133 134 135 136 137 138 139 140 141 142 143 144 145 146 147 148 149 150 151 152 153 154 155 | global_defs { notification_email { acassen@firewall.loc failover@firewall.loc sysadmin@firewall.loc } notification_email_from Alexandre.Cassen@firewall.loc smtp_server 192.168.200.1 smtp_connect_timeout 30 router_id LVS_DEVEL vrrp_skip_check_adv_addr vrrp_strict vrrp_garp_interval 0 vrrp_gna_interval 0 } vrrp_instance VI_1 { state MASTER interface eth0 virtual_router_id 51 priority 100 advert_int 1 authentication { auth_type PASS auth_pass 1111 } virtual_ipaddress { 192.168.200.16 192.168.200.17 192.168.200.18 } } virtual_server 192.168.200.100 443 { delay_loop 6 lb_algo rr lb_kind NAT persistence_timeout 50 protocol TCP real_server 192.168.201.100 443 { weight 1 SSL_GET { url { path / digest ff20ad2481f97b1754ef3e12ecd3a9cc } url { path /mrtg/ digest 9b3a0c85a887a256d6939da88aabd8cd } connect_timeout 3 nb_get_retry 3 delay_before_retry 3 } } } virtual_server 10.10.10.2 1358 { delay_loop 6 lb_algo rr lb_kind NAT persistence_timeout 50 protocol TCP sorry_server 192.168.200.200 1358 real_server 192.168.200.2 1358 { weight 1 HTTP_GET { url { path /testurl/test.jsp digest 640205b7b0fc66c1ea91c463fac6334d } url { path /testurl2/test.jsp digest 640205b7b0fc66c1ea91c463fac6334d } url { path /testurl3/test.jsp digest 640205b7b0fc66c1ea91c463fac6334d } connect_timeout 3 nb_get_retry 3 delay_before_retry 3 } } real_server 192.168.200.3 1358 { weight 1 HTTP_GET { url { path /testurl/test.jsp digest 640205b7b0fc66c1ea91c463fac6334c } url { path /testurl2/test.jsp digest 640205b7b0fc66c1ea91c463fac6334c } connect_timeout 3 nb_get_retry 3 delay_before_retry 3 } } } virtual_server 10.10.10.3 1358 { delay_loop 3 lb_algo rr lb_kind NAT persistence_timeout 50 protocol TCP real_server 192.168.200.4 1358 { weight 1 HTTP_GET { url { path /testurl/test.jsp digest 640205b7b0fc66c1ea91c463fac6334d } url { path /testurl2/test.jsp digest 640205b7b0fc66c1ea91c463fac6334d } url { path /testurl3/test.jsp digest 640205b7b0fc66c1ea91c463fac6334d } connect_timeout 3 nb_get_retry 3 delay_before_retry 3 } } real_server 192.168.200.5 1358 { weight 1 HTTP_GET { url { path /testurl/test.jsp digest 640205b7b0fc66c1ea91c463fac6334d } url { path /testurl2/test.jsp digest 640205b7b0fc66c1ea91c463fac6334d } url { path /testurl3/test.jsp digest 640205b7b0fc66c1ea91c463fac6334d } connect_timeout 3 nb_get_retry 3 delay_before_retry 3 } } } |

4. 完成高可用服务器配置(主从服务器配置)
1 | vi /etc/keepalived/keepalived.conf |
修改配置文件.
master上的keepalived.conf内容如下
1 2 3 4 5 6 7 8 9 10 11 12 13 14 15 16 17 18 19 20 21 22 23 24 25 26 27 28 29 30 31 | global_defs { notification_email { ancky2006@gmail.com } notification_email_from sns-lvs@gmail.com smtp_server 192.168.122.54 smtp_connection_timeout 30 router_id nginx_master # 设置nginx master的id,在一个网络应该是唯一的 } vrrp_script chk_http_port { script "/usr/local/src/check_nginx.sh" #最后手动执行下此脚本,以确保此脚本能够正常执行 interval 2 #(检测脚本执行的间隔,单位是秒) weight 2 } vrrp_instance VI_1 { state MASTER # 指定keepalived的角色,MASTER为主,BACKUP为备 interface eth0 # 绑定的网卡(当前centos的网卡,ifconfig可以查) virtual_router_id 66 # 虚拟路由编号,主从要一直 priority 100 # 优先级,数值越大,获取处理请求的优先级越高 advert_int 1 # 检查间隔,默认为1s(vrrp组播周期秒数) authentication { auth_type PASS auth_pass 1111 } track_script { chk_http_port #(调用检测脚本) } virtual_ipaddress { 192.168.122.200 # 定义虚拟ip(VIP),可多设,每行一个 } } |
删掉备注后如下:
1 2 3 4 5 6 7 8 9 10 11 12 13 14 15 16 17 18 19 20 21 22 23 24 25 26 27 28 29 30 31 | global_defs { notification_email { ancky2006@gmail.com } notification_email_from sns-lvs@gmail.com smtp_server 192.168.122.54 smtp_connection_timeout 30 router_id nginx_master } vrrp_script chk_http_port { script "/usr/local/src/check_nginx.sh" interval 2 weight 2 } vrrp_instance VI_1 { state MASTER interface eth0 virtual_router_id 66 priority 100 advert_int 1 authentication { auth_type PASS auth_pass 1111 } track_script { chk_http_port } virtual_ipaddress { 192.168.122.200 } } |
backup上的keepalived.conf内容如下:
1 2 3 4 5 6 7 8 9 10 11 12 13 14 15 16 17 18 19 20 21 22 23 24 25 26 27 28 29 30 31 | global_defs { notification_email { ancky2006@gmail.com } notification_email_from sns-lvs@gmail.com smtp_server 192.168.122.101 smtp_connection_timeout 30 router_id nginx_backup # 设置nginx backup的id,在一个网络应该是唯一的 } vrrp_script chk_http_port { script "/usr/local/src/check_nginx.sh" interval 2 #(检测脚本执行的间隔) weight 2 } vrrp_instance VI_1 { state BACKUP # 指定keepalived的角色,MASTER为主,BACKUP为备 interface eth0 # 绑定的网卡(当前centos的网卡,ifconfig可以查) virtual_router_id 66 # 虚拟路由编号,主从要一直 priority 99 # 优先级,数值越大,获取处理请求的优先级越高 advert_int 1 # 检查间隔,默认为1s(vrrp组播周期秒数) authentication { auth_type PASS auth_pass 1111 } track_script { chk_http_port #(调用检测脚本) } virtual_ipaddress { 192.168.122.200 # 定义虚拟ip(VIP),可多设,每行一个 } } |
删掉备注后如下:
1 2 3 4 5 6 7 8 9 10 11 12 13 14 15 16 17 18 19 20 21 22 23 24 25 26 27 28 29 30 31 | global_defs { notification_email { ancky2006@gmail.com } notification_email_from sns-lvs@gmail.com smtp_server 192.168.122.101 smtp_connection_timeout 30 router_id nginx_backup } vrrp_script chk_http_port { script "/usr/local/src/check_nginx.sh" interval 2 weight 2 } vrrp_instance VI_1 { state BACKUP interface eth0 virtual_router_id 66 priority 99 advert_int 1 authentication { auth_type PASS auth_pass 1111 } track_script { chk_http_port } virtual_ipaddress { 192.168.122.200 } } |
nginx检测脚本check_nginx.sh内容如下:
1 | vi /usr/local/src/check_nginx.sh |
1 2 3 4 5 6 7 8 | #!/bin/bash A=`ps -C nginx --no-header |wc -l` if [ $A -eq 0 ];then /usr/local/nginx/sbin/nginx #重启nginx if [ `ps -C nginx --no-header |wc -l` -eq 0 ];then #nginx重启失败,则停掉keepalived服务,进行VIP转移 killall keepalived fi fi |
删掉备注后如下:
1 2 3 4 5 6 7 8 | #!/bin/bash A=`ps -C nginx --no-header |wc -l` if [ $A -eq 0 ];then /usr/local/nginx/sbin/nginx if [ `ps -C nginx --no-header |wc -l` -eq 0 ];then killall keepalived fi fi |
1 | chmod +x /usr/local/src/check_nginx.sh |
5. nginx 页面加入IP地址.
1 2 | cd /usr/local/nginx/html vi index.html |
6. 开启nginx和keepalived.
1 2 3 4 5 | cd /usr/local/nginx/sbin/ ./nginx -s stop ./nginx systemctl restart keepalived.service |
7. 查看是否已经开启成功
1 2 | ps -ef | grep nginx ps -ef | grep keepalived |

8. 最终测试.
8-1. 浏览器输入虚拟 ip : 192.168.122.200
可以看到已经绑定到 192.168.122.101这台.

8-2. 192.168.122.101 这台 输入
1 | ip a //可以看到192.168.122.200 这个虚拟IP. |

8-3. 192.168.122.101这台 nginx 及 keepalived 都停止,
然后再 浏览器输入虚拟 ip : 192.168.122.200
可以看到已经跳转到 192.168.122.54


8-4. 192.168.122.54 这台 输入
1 | ip a //可以看到192.168.122.200 这个虚拟IP. |
